스위시맥스4 작품
1. Properties - Movie Properties를 클릭 후 다음과 같이 설정한다.
- Background color: 검정색, W/H=700/525, Frame rate: 25, SWF10, 확인, OK
2. Layout - View - Automatically adjust~체크, Zoom 100%, Fit Stage in Window

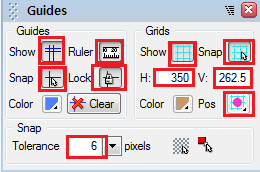
3. Guides에서 다음과 같이 설정한다.
- Guides: Show, Ruler, Snap
- Grids: Show, Snap, H: 350, V: 262.5, Position: 그리드가 개체 위에 위치
- Snap: Tolerance: 6
4. Stage에서 가이드라인을 다음과 같이 위치한다.
㉠ Stage에 우 클릭-Guides-Insert Vertical Guide 클릭
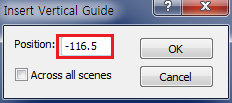 Insert Vertical Guide 창에
position : -116.5 입력 하고 OK 클릭
다시 Insert Vertical Guide 창에
position : 816.5 입력 하고 OK 클릭
- 위치 후 위 그림의 Guides의 Lock을 클릭
5. File - Save As... - 본인폴더 - sm468
6. Outline – Scene_1 - Insert - Import Animation - sf 입력
㉠ Transform O=X, Center X : 350 Y : 262.5
7. Content-Library-Import to Library-Image-img01~09입력 - Image Resources(확인)
8. Content - Image Resources를 열고(+를 –로) - img01~09전부 선택 -
Add Link to Stage
㉠ Transform O=X, Center Left
㉡ Outline에 img01~09(위에서 아래로)
9. Stage에서 img01~09의 이미지를 다음과 같이 위치한다.
㉠ img01 X : 0 Y : 0, 0, ㉡ img02 X : 933 Y : 0, ㉢ img03 X : 1866 Y : 0
㉣ img04 X : 0 Y : 525, ㉤ img05 X : 933 Y : 525, ㉥ img06 X : 1866 Y : 525
㉦ img07 X : 0 Y : 1050, ㉧ img08 X : 933 Y : 1050, ㉨ img09 X : 1866 Y : 1050
10. Outline - Scene1 - img01~09 전부 선택 - Grouping - Group as MovieClip
이름: img01,
㉠ Transform O=X Center Left, X : -116.5 Y : 0
11. Outline - Scene1 - img01 선택 Copy Object-Paste In Place(1번) 이름: img02,
㉠ Outline의 img02를 img01 아래로 이동한다. Open Image 한다.
㉡ Outline의 img01 선택
㉢ 메뉴줄 Window-Tint 클릭
Tint 창에서
Alpha – Custom : 50%
12. Outline - Scene1 – img01+img02전부 선택-Grouping - Group as Movie Clip
이름 : img,
㉠ Transform O=X Center Left, X : -116.5 Y : 0
13. Content - Image Resources를 열고(+를 –로) - img01 선택 - Add Link to Stage
㉠ Transform O=X Center X : 350 Y : 262.5
㉡ Properties
이름 : mask,
Troke Style : None,
Fill Color Solid-solid-기본색
14. Outline – Scene_1 – img+mask 전부 선택-Grouping - Group as Movie Clip
이름 : img,
㉠ Properties-Use bottom object as mask 체크,
㉡ Transform O=X Center Left X : -116.5 Y : 0
15. Outline-Scene_1-Content - Image Resources를 열고(+를 –로) -
img01~09 전부 선택- Add Link to Stage
㉠ Transform O=X Center
㉡ Properties 가로 : 60 세로 : 33.6
㉢ Outline: img01~09(위에서 아래로)-이름: btn01~09(위에서 아래로)
16. 버튼을 Stage에서 우측 아래에 수평으로 위치한다.
㉠ btn01-Transform O=X Center X : 143.5 Y : 485,
㉡ btn09-Transform O=X Center X : 656.5 Y : 485,
㉢ but01 ~ but09 까지 모두 선택 후
㉣ 메뉴줄 Window-Align 클릭
Align 창에서
Align : All Selected
Align Vertical Center
Distribute Horizontal Center
17. Outline - Scene1 - btn01~09 전부 선택 Grouping - Group as Movie Clip
㉠ Properties-이름 : btn
㉡ Transform O=X Center X : 400 Y : 485
㉢ 메뉴줄 Window-Filters 클릭
Filters 창에서
Drop Shadow - Default
18. Outline – Scene_1 선택 하고- Layout - Tools - Text Tool선택
㉠ Properties
Fonts : Bispo, Font Size : 40,
Thr coloe of the text : #FFFFFF, Bold : B,
㉡ Stage에 클릭 한 후에
㉢ Properties
Edit-Enter Tex 창에 : Sliding Effect Gallery 입력
㉣ Transform O=X Center X : 170 Y : 35
19. Outline – Scene_1 – “T liding Effect Gallery” - Grouping - Group as Movie Clip
㉠ Properties- 이름: title
㉡ Transform O=X Center X : 170 Y : 35
㉢ 메뉴줄 Window-Filters 클릭
Filters 창에서
Drop Shadow - Default
20. Outline – Scene_1 - Insert - Import Animation – sm.swi 입력
㉠ Transform: O=X Center X : 675.85 Y : 40
㉡ 메뉴줄 Window-Filters 클릭
Filters 창에서
Drop Shadow - Default
21. Outline – Scene_1 - Insert - Import Animation – sof.swi 입력
㉠ Transform: O=X Center X : 646.5 Y : 40
㉡ 메뉴줄 Window-Filters 클릭
Filters 창에서
Drop Shadow - Default
22. Outline – Scene_1 - Insert - Import Animation – sign.swi - Import
㉠ Transform: O=X Center X : 581.15 Y : 40
23. Outline – Scene_1 - sign, sof, sm 전부 선택-Grouping - Group as MovieClip
이름: sss
㉠ Transform: O=X Center X : 610 Y : 40
24. Outline – Scene_1 - Insert - Movie Clip(빈 Movie Clip 입력)
㉠ Properties-이름 : bgm
㉡ Outline 의 bgm를 선택 하고 Script 클릭 하여 다음과 같이 작업 한다.
Add Script - Sound - playSound - ?(
※ Import - bgm
Sound effect 클릭
Sound Effect 창에서
Don’t play sound if it is already playing 체크
Loop Sound : 1000
Volum : 100
OK 클릭
㉢ Outline 의 bgm를 선택-Transform O=X Center X : 350 Y : 262.5
25. Outline – Scene_1 - Insert - Movie Clip(2번)
㉠ Transform O=X Center X : 350 Y ; 262.5
㉡ Properties : 이름 : (위) star, (아래)action
㉢ Outline의 star, action 전부 선택-Grouping - Group as Movie Clip
이름 : star
㉠ Transform O=X Center, X : 350 Y : 262.5
26. Outline – Scene_1 – star를 열고(+를 –로)- 다시 star를 열고(+를 –로)
㉠ Layout - Tools - Ellipse Tool클릭 – Stage의 star 위에 그린다.
㉡ Transform O=X Center X : 0 Y ; 0
㉢ Properties
이름 : star
가로 ; 50 세로 ; 50
Stroke Style : 실선
Theckness : 0
Stroke Clolr : #FFFFFF(Alpha ; 50%)
Fill Color : #FFFFFF(Alpha ; 50%)
㉣ Timeline의 star 1 프레임-Looping continuously - Wild-Rainbow(50F)
㉤ Outline – Scene_1 – star를 열고(+를 –로)-star를 선택
㉥ 메뉴줄 Window-Filters 클릭
Filters 창에서
Glow-Default 클릭
Glow를 열고(+를 –로)
Shadow Color : #FFFFFF
Blur X(px) : 10
Blur Y(px) ; 10
Strength : 200
27. Outline – Scene_1 - Insert - Import Animation – line.swi 입력
㉠ Grouping - Ungroup
㉡ line01-Transform O=X Center X : 204.5 Y : 52.25
㉢ line02: Transform O=X Center X : 403.4 Y : 506
28. Outline – Scene_1 아래의 순서를 다음과 같이 위치한다.
- star, bgm, sss, line01, line02, title, btn, img, sf
29. Outline – Scene_1 아래의 각각의 개체에 Script를 적용한다.
㉠ outline의 img를 열고(+를 –로) - 아래 img를 열고(+를 –로)
㉮ img01를 선택 하고 자료 중에 다음을 복사 하여 Script 창에 붙여넣기 한다.
onSelfEvent (load) {
targetx = 0;
targety = 0;
speedx = 0.2;
speedy = 0.2;
}
onSelfEvent (enterFrame) {
this._x = this._x + speedx * (targetx - this._x);
this._y = this._y + speedy * (targety - this._y);
}
㉯ img02를 선택 하고 Script 창에 붙여넣기 하고 다음과 같이 수정 한다.
onSelfEvent (load) {
targetx = -1866;
targety = -1050;
speedx = 0.2;
speedy = 0.2;
}
onSelfEvent (enterFrame) {
this._x = this._x + speedx * (targetx - this._x);
this._y = this._y + speedy * (targety - this._y);
}
img01-1 img02-9 | img01-2 img02-8 | img01-3 img02-7 |
img01-4 img02-6 | img01-5 img02-5 | img01-6 img02-4 |
img01-7 img02-3 | img01-8 img02-2 | img01-9 img02-1 |
여기서 Img02의 target 이동 거리는 img의 Width : 933 Height : 525를 적용 한 수치임
㉡ Outline 의 btn를 선택 Script 소스를 복사 하여 Script 창에 붙여넣기 한다.
onSelfEvent (load) {
targetx = 400;
targety = 485;
speedx = 0.1;
speedy = 0.1;
}
onSelfEvent (enterFrame) {
this._x = this._x + speedx * (targetx - this._x);
this._y = this._y + speedy * (targety - this._y);
}
㉢ Outline 의 btn를 열고(+를 –로) btn01를 선택하고 Script 소스를 복사 하여 Script 창에 붙여넣기 한다.
on (press) {
_root.img.img.img01.targetx = 0;
_root.img.img.img01.targety = 0;
_root.img.img.img02.targetx = -1866;
_root.img.img.img02.targety = -1050;
}
㉮ Outline 의 btn를 열고(+를 –로) btn02를 선택하고 붙여넣기 한 후 다음과 같이 수 정 한다.
on (press) {
_root.img.img.img01.targetx = -933;
_root.img.img.img01.targety = 0;
_root.img.img.img02.targetx = -933;
_root.img.img.img02.targety = -1050;
}
㉯ Outline 의 btn를 열고(+를 –로) btn03를 선택하고 붙여넣기 한 후 다음과 같이 수 정 한다.
on (press) {
_root.img.img.img01.targetx = -1866;
_root.img.img.img01.targety = 0;
_root.img.img.img02.targetx = 0;
_root.img.img.img02.targety = -1050;
}
㉰ Outline 의 btn를 열고(+를 –로) btn04를 선택하고 붙여넣기 한 후 다음과 같이 수 정 한다.
on (press) {
_root.img.img.img01.targetx = 0;
_root.img.img.img01.targety = -525;
_root.img.img.img02.targetx = -1866;
_root.img.img.img02.targety = -525;
}
㉱ Outline 의 btn를 열고(+를 –로) btn05를 선택하고 붙여넣기 한 후 다음과 같이 수 정 한다.
on (press) {
_root.img.img.img01.targetx = -933;
_root.img.img.img01.targety = -525;
_root.img.img.img02.targetx = -933;
_root.img.img.img02.targety = -525;
}
㉲ Outline 의 btn를 열고(+를 –로) btn06를 선택하고 붙여넣기 한 후 다음과 같이 수 정 한다.
on (press) {
_root.img.img.img01.targetx = -1866;
_root.img.img.img01.targety = -525;
_root.img.img.img02.targetx = 0;
_root.img.img.img02.targety = -525;
}
㉳ Outline 의 btn를 열고(+를 –로) btn07를 선택하고 붙여넣기 한 후 다음과 같이 수 정 한다.
on (press) {
_root.img.img.img01.targetx = 0;
_root.img.img.img01.targety = -1050;
_root.img.img.img02.targetx = -1866;
_root.img.img.img02.targety = 0;
}
㉴ Outline 의 btn를 열고(+를 –로) btn08를 선택하고 붙여넣기 한 후 다음과 같이 수 정 한다.
on (press) {
_root.img.img.img01.targetx = -933;
_root.img.img.img01.targety = -1050;
_root.img.img.img02.targetx = -933;
_root.img.img.img02.targety = 0;
}
㉵ Outline 의 btn를 열고(+를 –로) btn0를 선택하고 붙여넣기 한 후 다음과 같이 수 정 한다.
on (press) {
_root.img.img.img01.targetx = -1866;
_root.img.img.img01.targety = -1050;
_root.img.img.img02.targetx = 0;
_root.img.img.img02.targety = 0;
}
㉣ Outline 의 title를 선택하고 Script 소스를 복사 하여 Script 창에 붙여넣기 한다.
onSelfEvent (load) {
targetx = 170;
targety = 35;
speedx = 0.1;
speedy = 0.1;
}
onSelfEvent (enterFrame) {
this._x = this._x + speedx * (targetx - this._x);
this._y = this._y + speedy * (targety - this._y);
}
㉤ Outline 의 sss를 선택하고 Script 소스를 복사 하여 Script 창에 붙여넣기 한다.
- sss
onSelfEvent (load) {
targetx = 610;
targety = 40;
speedx = 0.1;
speedy = 0.1;
}
onSelfEvent (enterFrame) {
this._x = this._x + speedx * (targetx - this._x);
this._y = this._y + speedy * (targety - this._y);
}
㉥ Outline 의 sss를 열고(+를 –로)-sof를 열고(+를 –로)
㉮ offsound를 선택하고 Script 창의 Script 소스를 다음과 같이 수정 한다.
on (press) {
stopSound("bgm");
}
on (press) {
if(_root.sss.sof._currentFrame == 2){
_root.sss.sof.gotoAndStop(1);
}else{
_root.sss.sof.nextFrame();
}
}
㉯ onsound를 선택하고 Script 창의 Script 소스를 다음과 같이 수정 한다.
on (press) {
stopSound("bgm");
}
on (press) {
if(_root.sss.sof._currentFrame == 2){
_root.sss.sof.gotoAndStop(1);
}else{
_root.sss.sof.nextFrame();
}
}
㉦ Outline의 sss를 열고(+를 –로) sm를 열고(+를 –로)
㉮ noscale를 선택 하고 Script소스를 복사하여 Script 창에 붙여넣기 한다.
on(press) {
if (Stage.displayState == "normal" && _root.title.targetx == 170 && _root.btn.targetx == 400 && _root.sss.targetx == 610) {
Stage.displayState= "fullScreen";
Stage.scaleMode = "noScale";
_root.title.targetx = 50;
_root.btn.targetx = 520;
_root.sss.targetx = 730;
}
}
on (press) {
if(_root.sss.sm._currentFrame == 3){
_root.sss.sm.gotoAndStop(1);
}else{
_root.sss.sm.nextFrame();
}
}
㉯ showall를 선택 하고 Script소스를 복사하여 Script 창에 붙여넣기 한다.
- sss - sm - showall
on(press) {
if (Stage.displayState == "fullScreen" && _root.title.targetx == 50 && _root.btn.targetx == 520 && _root.sss.targetx == 730) {
Stage.displayState= "fullScreen";
Stage.scaleMode = "showAll";
_root.title.targetx = 170;
_root.btn.targetx = 400;
_root.sss.targetx = 610;
}
}
on (press) {
if(_root.sss.sm._currentFrame == 3){
_root.sss.sm.gotoAndStop(1);
}else{
_root.sss.sm.nextFrame();
}
}
㉰ normal를 선택 하고 Script 창에 소스를 다음과 같이 수정 한다.
on(press) {
if (Stage.displayState == "fullScreen") {
Stage.displayState= "normal";
}
}
on (press) {
if(_root.sss.sm._currentFrame == 3){
_root.sss.sm.gotoAndStop(1);
}else{
_root.sss.sm.nextFrame();
}
}
㉧ Outline의 star를 열고(+를 –로)
㉮ star를 선택 하고 Script 소스를 복사하여 Script 창에 붙여넣기 한다.
- star - star
onSelfEvent(load){
this._xscale = 0;
this._yscale = 0;
opacity = 1;
}
onSelfEvent(enterFrame){
this._xscale = this._xscale + opacity;
this._yscale = this._yscale + opacity;
if(this._xscale < 0 && this._yscale < 0 || this._xscale > 30 && this._yscale > 30){
opacity = -1 * opacity;
}
}
㉯ action를 선택 하고 Script 소스를 복사하여 Script 창에 붙여넣기 한다.
onSelfEvent(load){
i = 0;
}
onSelfEvent (enterFrame){
if(i<50){
_root.star.star.duplicateMovieClip('star'+i, i);
_root.star['star'+i]._x = 50 + random(833);
_root.star['star'+i]._y = 100 + random(325);
i = i + 1;
}
}
30. 즐거운 하루가 되시기를 바랍니다.

'Swish Max 4 > shish 공부' 카테고리의 다른 글
| Davies 의 시 (0) | 2013.09.02 |
|---|---|
| 만들수만 있다면 (0) | 2013.08.27 |
| 여름 (0) | 2013.08.18 |
| 바다의 시 셋 (0) | 2013.08.13 |
| 내 마음의 등대 / 우기수 (0) | 2013.07.29 |